Mobile devices have fundamentally reshaped the e-commerce landscape, transforming how consumers browse, discover, and purchase products. The increasing accessibility of high-speed internet and sophisticated mobile applications has fostered a significant shift in consumer behavior, with a growing preference for shopping on the go. This has led to a surge in mobile commerce transactions, pushing businesses to optimize their online stores for seamless mobile experiences, including responsive design, intuitive navigation, and optimized checkout processes. The convenience and immediacy offered by mobile shopping are driving this trend, making it a key factor in the evolving e-commerce environment.
Troubleshooting Common Wiring Issues
Understanding Wiring Diagrams
Wiring diagrams are crucial for any car dash cam installation. They provide a visual representation of how the power and video connections are routed. Carefully studying these diagrams before starting any wiring work is essential to avoid damaging the dash cam or your vehicle's electrical system. Incorrect wiring can lead to malfunctioning or even dangerous situations, so taking your time and double-checking everything is vital for a successful installation. It's often helpful to have a qualified technician review your work if you're unsure about any aspect of the wiring.
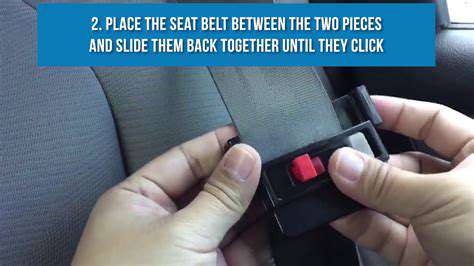
Different dash cam models may have varying wiring requirements. Always refer to the specific instructions provided with your dash cam. These instructions should detail the necessary connections for power and video output, as well as any specific considerations for your vehicle's electrical system. Understanding the color-coding of wires is also critical. Matching the correct wires to the correct connections within the vehicle's electrical system is key to preventing damage.
Identifying Power Sources
Finding a suitable power source is a key step in dash cam installation. You need a constant power source, meaning it's always on, rather than relying on the ignition. This ensures the dash cam records even when the car isn't running. Common locations include accessory power points, which are often found near the dashboard or the center console.
Always consult your vehicle's wiring diagram to confirm the safe and appropriate locations for tapping into the vehicle's power system. Improperly tapping into power sources can damage your vehicle's electrical system and void any warranties. Some dash cams may include a dedicated power source, which is an ideal solution if available. Be mindful of the amperage requirements of your dash cam and select a power source that can adequately handle the load.
Troubleshooting Power Issues
If your dash cam isn't powering on, there are several potential causes. First, double-check all connections to ensure they are secure and properly aligned. Loose connections are a common source of power problems. If connections appear secure, inspect the fuse associated with the power source you're using. A blown fuse can prevent the dash cam from receiving power. Replacing the fuse with a correctly rated one is often the solution.
Another possible issue is an incorrect power source selection. Choosing a power source that doesn't provide enough amperage to the dash cam can result in poor performance. Consulting the dash cam's specifications will ensure you're using an appropriate power source. If you're still experiencing problems, consider checking your vehicle's wiring diagram for any additional safety precautions or guidelines. If you're not comfortable working on your vehicle's electrical system, seeking professional assistance is highly recommended.
Addressing Video Connection Problems
Issues with the video connection can range from a poor signal to a complete lack of video recording. First, make certain that the video cable is securely connected to both the dash cam and the monitor or recording device. Ensure the cable isn't damaged or frayed, as this can disrupt the signal. If the cable is intact, check the video input settings on the dash cam to ensure they're correctly configured.
Consider the potential for interference from other electrical components. Sometimes, other electrical components in the vehicle might be interfering with the video signal. Re-routing or re-positioning the video cable might resolve this issue. If these steps don't resolve the problem, consulting a qualified technician might be necessary.
Checking Grounding Connections
A weak or improper grounding connection can cause various problems with your dash cam installation, including erratic behavior or complete failure. Ensure that the grounding wire is correctly connected to a solid ground point on your vehicle's chassis, and that the connection is clean and secure. Improper grounding can lead to electrical interference and damage. Make sure the grounding wire is not too long or too thin, as these factors can contribute to signal degradation.
A thorough inspection of all grounding connections is essential to ensure proper functionality. Incorrect grounding can lead to voltage fluctuations, impacting the overall performance and reliability of the dash cam. Verify the grounding connection is securely fastened and the connection points are clean and corrosion-free.
Maintaining Your Dash Cam System
Regular Maintenance for Optimal Performance
Maintaining your dash cam system is crucial for ensuring its long-term functionality and capturing high-quality video footage. Regular checks are essential to avoid unexpected malfunctions and ensure your recordings remain clear and usable in the event of an accident or incident. This includes checking the battery level, ensuring the SD card is properly inserted and functioning correctly, and verifying the camera lens is free of any obstructions or smudges that could affect image quality. Inspecting the mounting hardware, checking for any signs of damage or loosening, and ensuring a secure connection to the vehicle's power source are also important preventative measures.
Cleaning the camera lens regularly with a soft, lint-free cloth will prevent dust and debris from affecting image clarity. This simple step can significantly improve the quality of your recordings. It's also recommended to periodically review your recordings to ensure the camera is working as expected and that the footage is clear. This allows you to identify and address any potential issues promptly, like low storage space on the SD card, before they escalate.
Troubleshooting Common Issues
Dash cam systems, like any electronic device, can experience occasional glitches. Knowing how to troubleshoot common issues can save you time and frustration. A common problem is a weak or dying battery. If your dash cam is not recording or displaying footage properly, checking the battery level is a crucial first step. If the battery is low, consider using a battery charger or investing in a portable power bank to ensure a consistent power supply.
Another prevalent issue is a malfunctioning SD card. If your dash cam isn't saving recordings or is displaying error messages, the SD card might be the culprit. Try a different, known-good SD card to confirm if the problem lies with the card itself. If the problem persists, consult the manufacturer's documentation or contact their support team for further assistance.
Additionally, issues with the camera lens can affect image quality. Inspect the lens carefully for any debris, scratches, or smudges. Cleaning the lens with a microfiber cloth and lens cleaning solution will restore its clarity. If you've tried these steps and the problem persists, consider contacting the manufacturer's support for further troubleshooting.
Incorrect mounting or loose connections can also be a problem. Ensure the dash cam is securely mounted to the windshield and all connections to the vehicle's power source are firm. If the installation was done by someone else, it is always a good idea to have a professional check the installation for issues that may not be immediately apparent.